
I designed this project while in graduate school in 1974. It’s a simple, easy way to calculate the height of a satellite from a single observation. To carry it out, you need two students and a small telescope with a stable mounting. One student operates the telescope and the other uses the naked eye.
Equipment
The ideal equipment for this experiment is a small telescope with an altazimuth mount and a wide field of view. The ideal field of view is about 2º but an adept observer can make it work with a field diameter of only 1º. It’s also possible — and much easier — to do this experiment with a camera, but few digital cameras are sensitive enough to detect a satellite unless it’s a big bright one like the ISS. For now, I’ll assume that you’ll use the visual method, and explain how it’s done with a camera later.
The naked eye observer will need a chart of the sky on which he can draw. Ideally it will be a full-sky chart customized for the night and time in question; you can get these at the Heavens-Above website shown below. This person will also need a digital device capable of recording voice. Most smartphones have an app for that.
Selecting a target
To carry out the experiment, you have to give the students a satellite prediction, which can easily be found at the website Heavens-Above. You set up an account there with your latitude and longitude, so that it can make correct predictions for your exact location. The International Space Station is always a good target, because it’s big and bright, but depending on your location, you might not get a good pass more than once a week. If you can find a pair of passes just 90 minutes apart, that’s even better, because you can get really good data that way.
The students need to have a rough idea of where the satellite will appear in the sky. As always with astronomy, it’s good to have a dark location without many trees. The students set up their telescope pointing in roughly the direction in which the satellite will first appear.
When the satellite appears, the telescope operator swings into action, attempting to get the satellite in view in the telescope. This is difficult, but with a little practice the telescope operator can learn how to do it. Have them practice on high-flying jet aircraft during the day; that’s a similar challenge.
As the observer tracks the satellite, the naked-eye observer should be assessing the motion of the satellite, looking for the exact moment when the satellite is highest in the sky. They should be giving auditory cues to the telescope operator, warning them as the satellite approaches its highest point. At about ten seconds before maximum altitude, the naked-eye observer says “Ten seconds!” and the telescope operator prepares for his observation.
The telescope operator should have gotten comfortable enough tracking the satellite to be able to jump ahead of the satellite so that it will enter the field of view, cross right down the middle of the field of view, and exit at the opposite edge, all while the telescope is stationary. Again, this takes practice, but if the telescope operator is doing this continually as the satellite rises, they should get very close to perfection. The instant that the satellite appears on one edge, the telescope operator shouts “Begin!”; the instant it leaves the field of view, the telescope operator shouts “End!”. The naked-eye observer should be close enough to the telescope observer that the shouts will be heard on the voice recorder.
At the same time, the naked-eye observer is making a very careful assessment of exactly where in the sky the satellite was at its maximum altitude. This is best done by noting distances and angles to nearby stars. Immediately after the maximum, the naked-eye observer should mark the highest point of the satellite on the star map.
One last refinement: the telescope operator will not get the telescope perfectly positioned; the satellite will likely not go through the center of the field of view. It is possible to improve on the observation by noting the distance of the satellite’s closest approach to the center of the field of view. In the diagram below, the blue line marks that distance as the offset. The student should estimate this value as a fraction of the radius of the field of view; in this case, the offset would be about 30% of the full radius of the field of view.
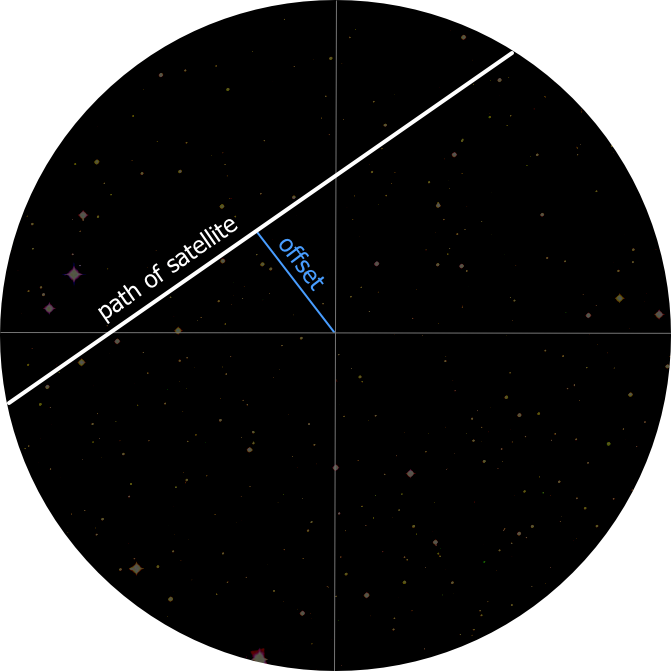
The value of this measurement is that it permits a more accurate estimate of the angular velocity of the satellite. The student first measures the diameter of the field of view. The easiest way to do this is by timing how long it takes for a star to completely cross the field of view. Knowing that the earth turns 360º in 24 hours, or 1º in 240 seconds, the student can calculate the diameter of the field of view. The student can correct for the offset error with some simple trigonometry.
Now they have two numbers: the angular velocity of the satellite, and its maximum altitude. Now it’s time for number-crunching. The algorithm to use is a convergent calculation, perfect for solving with a computer. Here are the steps:
1. Assume that the satellite was 100 km above the surface of the earth.
2. Calculate the straight-line distance from the observer to the satellite using trig.

3. Use the straight-line distance and the angular velocity to calculate the linear velocity of the satellite.
4. Use basic physics to calculate the height of a satellite in a circular orbit moving with that linear velocity.

When you solve this for r, subtract the radius of the earth from it and you get a new value for the height of the satellite. Repeat this process and the result converges to the correct value.
Stretch goals
There are a number of ways to improve on this experiment. If the student can get a camera sensitive enough to record a star background and the satellite (you’ll have to use the International Space Station), then it is possible to get much more accurate results. The only trick lies in getting the times between shots accurately. There are a variety of schemes possible here, but they depend heavily on the camera used. This requires some cleverness. The best, of course, would be an outright video at a known frame rate, but getting video of such faint images is very difficult.
Once the student has images of the satellite, he must calculate its altitude from its relationship to the background stars. It’s possible to just eyeball it, of course, but it’s also possible to measure linear distances on them image using the computer and then use a little spherical trig to get the precise position in right ascension and declination. Once that is established, the altitude and azimuth can be calculated, but you’ll need to have the sidereal time, which requires that you record the time of the photo.
It is also possible to refine the measurements if you get a good measurement of two succeeding passes of the satellite, but some geometry will be necessary to compare one pass with the next. Hint: just take into account the rotation of the earth to get proper correspondence between the two passes. With a precise measurement of the orbital period, you can get another way to calculate the satellite’s height.
You can also do the old classic two-station solution, using two cameras at two locations separated by at least 30 km. But students will need to be good with image measurements on the computer and spherical trig.
