
December 11th, 2009
You probably think that the title of this essay is figurative. It isn’t. I intend to demonstrate that pounding dirt can be a crucial process -- under certain circumstances.
Those circumstances are the placement of large wood fence posts. Now, you city slickers might not have much need for the information in this essay, but you still might find it interesting on the off chance that you lose your job, move to the country, and get a new job as a cowboy. Because one of the most important tasks of any cattle rancher is keeping the fences solid. Of course, even people in suburbia need fences to keep the neighbor’s kids out of the garden or whatever. Whatever your need, this essay might be of value to you.
Now, the ideal way to put a post into the ground is to dig a hole, pour in some concrete, then shove the post into the concrete. This yields a strong support that will last for many years. A post in concrete can last 50 years under good conditions. However, there are three problems with using concrete:
1. You have to get the concrete to the site of the fencepost. That’s no problem with a typical suburban fence, but out in the country that in itself can be quite a challenge. The concrete required to plant one fencepost can easily weigh a hundred pounds, and lugging that kind of weight a couple of hundred yards can be a bit of a strain. There’s also the problem of getting the water to mix the concrete. All in all, using concrete in a fence in the country can involve a great deal of logistics effort.
2. The manufacturing process for concrete releases enormous amounts of carbon dioxide into the air. I don’t know the exact figure, but it’s certainly in the same ballpark as the concrete itself. In other words, a hundred pounds of concrete -- enough for one fencepost -- will require the release maybe a hundred pounds of carbon dioxide during its manufacture. That’s not nice.
3. If you ever need to pull the post out, you’ve got a problem. Getting the damn thing out of the ground is a hassle, and once you’ve got it out, what do you do with it? Stick it by the back porch?
All of this leads some people to prefer putting posts directly into the ground. Unfortunately, posts in the ground rot out eventually. How long will that take? That depends upon many factors, and this essay will explain those factors and what can be done to slow down the rot.
Unless you’ve got termites, the rotting process is driven primarily by a number of molds, fungi, and bacteria. The key consideration is the dampness of the wood; these creatures require a minimum water content of 20% in order to do their damage. This is why wood in the desert lasts forever: there’s almost no water to sustain the decay-inducing critters. Unfortunately, you can’t do a whole lot to control the water content of your fenceposts, because they’re in the ground, and the ground holds water.
The good news, however, is that you can take a number of steps to slow the rot. A common procedure is using chemicals that kill the bugs that eat the wood. You can purchase wood that has been pressure-treated with such preservatives. You can also purchase fungicides and brush them onto the exterior of the post. The most common is copper naphthenate. This stuff really does a job. Tests by the Oregon State Arboretum showed that posts made of Douglas Fir last only about 4 years in western Oregon, but if they are treated with copper naphthenate, their lives can be extended to as long as 24 years.
There remains one other trick available to you: pounding the dirt. Dirt can hold water only because there are microscopic gaps between the grains of the dirt. This diagram should help make the idea clear:
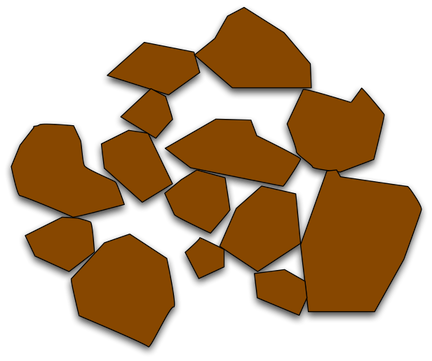
The gaps between the grains of soil hold the water. Now suppose that we were to pound this soil with a hammer; it might end up looking like this:
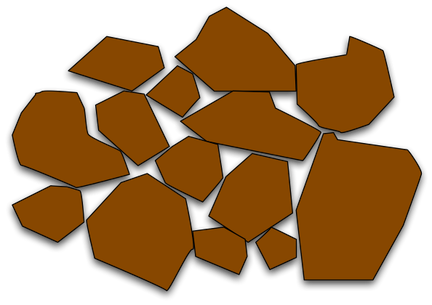
Thus, pounding the dirt reduces the amount of airspace between the grains of soil and reduces the amount of water the soil can hold.
You might think that soil is already fairly well-compacted. It isn’t; most soil still has plenty of water capacity. See for yourself: take your hammer outside and pound some soil. You will create a depression in the soil surface that is not counterbalanced by a surrounding lip of soil that has been pushed up. You really are compacting the soil. Here’s a diagram showing how a fencepost absorbs water:
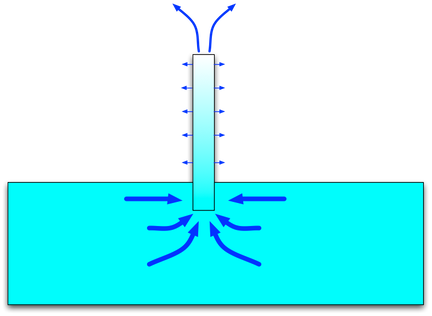
(Most of the water flow is up through the top of the post, because that’s the way the tree is designed: to conduct water upwards, not sideways.)
Now suppose that you could surround the base of the post with a substance that holds less water than the soil. With less water in contact with it, the post itself has less internal water:
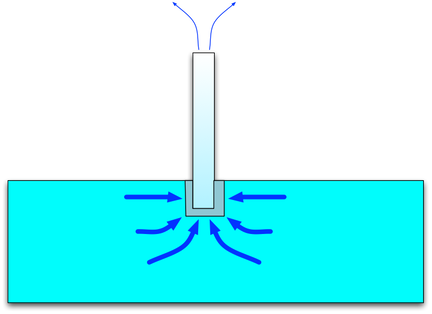
You could use concrete for that waterproof sleeve, but concrete poses problems I already mentioned. You could wrap the bottom of the post in plastic, but that would probably be punctured. The most important part of the post is the bottom; that’s the part that absorbs water most readily, so that’s the part you must devote the greatest effort to protecting from water. There are a variety of substances that you could daub or brush onto the bottom, but anything good enough to stick well and last for years is probably too expensive to justify.
Now you can see why pounding dirt is so useful: it compacts the soil around the base of the post so that the soil cannot hold as much water; as a result, the base of the post stays drier and will resist fungi for longer.
This is the procedure I follow:
First, I dig the narrowest hole I can, aiming for a hole about one inch wider than the post. This will yield an annulus around the post of only one-half inch in thickness. In practice, I tend to get a somewhat larger hole, but I never get an annulus as large as one inch in thickness. I dig the hole between 18 inches and 24 inches in depth, depending upon the circumstances. It’s quite easy to do: I have marks on my posthole shovels showing depths of 18 inches and 24 inches.
I use copper naphthenate for my fungicide; it can dramatically extend the life of your posts. I don’t brush the stuff onto the post -- that’s too wasteful. Instead, I put the stuff into a plastic spray bottle, line up the posts on a surface, and spray them all together. That wastes less chemical and permits me to roll them a little and spray again. I repeat the process every day or two, so that the stuff seeps further and further into the posts. Also, when you use a brush, it’s almost impossible to insure that none gets on your or your clothes, and that stuff really stinks!
Once my post is ready for planting, I drop it into the hole and position it. Usually I’ll have to drop in a shovelful or two of dirt to get it to stay in position. Once I’ve got it exactly where I want it, I put in a few more shovelfuls of dirt. Then I use a stick 3/4" by 3/4" by 36 inches to compact the dirt in the hole. I go around the hole, compacting it step by step. It only takes a minute to get all the dirt compacted. Then I put another shovelful of dirt into the hole and repeat the process. This takes five to ten minutes. Once the dirt has gotten close to the top of the hole, I start using a plastic mallet to pound the stick to compact the dirt more densely. You’d be surprised how much you can compact the dirt. My experience is that I end up putting most of the dirt that came out of the hole right back in. That’s with the post in the hole!
What’s especially useful is the fact that, if you pay attention, you can tell when the dirt reaches near-solidity. The stick just stops sinking when you hit it with the mallet. It really is quite striking how the stick pushes the dirt down inch by inch, and suddenly stops pushing down when the dirt is compacted. However, it does take a lot of pounding to get it that far.
The final step with the last bits of free dirt is to pound the dirt at the base of the post directly with the plastic mallet. A steel sledge or hammer is too heavy for this work; it will simply push the dirt around. A wooden mallet is a bit too light. I prefer the hard plastic dead bounce mallets for this task; they have just the right weight and size. I circle around the post, pounding the dirt down. When I’m done, the ground at the post is level.